
|
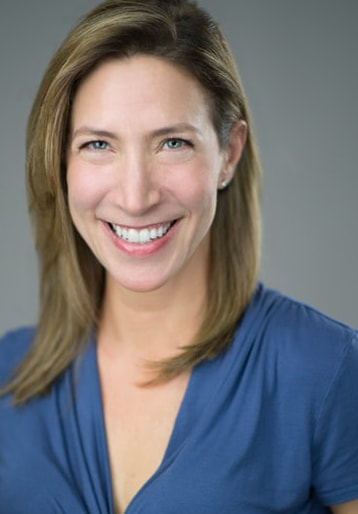
Take a look at the two images below. Both are the same shot, just cropped differently:
The first one looks like a standard business headshot, and the second looks like a stylized actor headshot. What makes a good headshot is not just the lighting and background. Surprisingly, the way it's cropped and formatted is actually just as important! Cropping headshots can make the difference between a highly engaging, professional photo... and one that looks like it was taken by an amateur. Read on to learn all about cropping, framing, and dimensions for actor and business headshots.
|
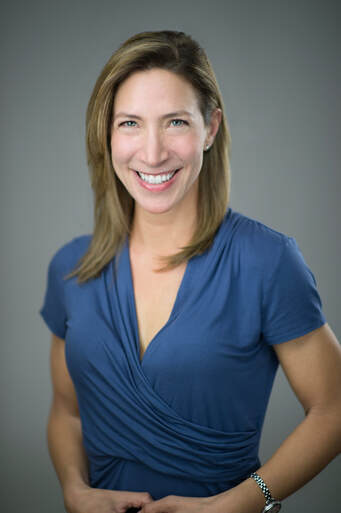

Headshot Photo Size: 8" x 10"
|

Headshot Photo Size: 8" x 12"
|
Technically speaking, you can use either of these photos, as long as they are physically printed on a sheet of paper that is 8 inches by 10 inches in size.
The second one (where the actor is wearing a leather jacket) would just need to have a white or black border around the edges.
How to Attach Your Resume to Your Headshot
Any time you attend an in-person audition or meet with an agent or manager, you should always bring along a few extra copies of your headshot with your most up to date resume stapled to the back.
To attach your resume, you'll need to format it properly first and then print it out. Use scissors or a paper trimmer to cut it down to 8" x 10", making sure that it's centered. You can then staple it to the back of your headshot at each corner.
If you're still putting your resume together and hate the frustration of formatting, I've done all the work for you:
3 FREE Google Docs Resume Templates
Save Yourself the Frustration of Alignment & Formatting!
Most actor resume templates require special software or are very complicated to use and edit. For that reason, I've put together 3 super simple Google Docs templates ANYONE can use (no matter what type of computer you have).
Here's what you get:
Here's what you get:
|

|
Here's a video that shows you how to attach your resume to your headshot:
Do Headshots Have to be 8 x 10?
Yes. The aspect ratio for headshots should always be 8" x 10" when printed because casting directors HATE having to deal with prints that are not that standard professional headshot size.
In fact, they'll often throw a headshot out if it's printed on normal 8.5" X 11" paper because it's bigger than all the other headshots in their pile, making the whole pile harder to hold.
Yes, you heard that right. Casting directors have literally thrown out people's hopes and dreams just because their headshot is slightly bigger than the others in the pile.
Should Your Name be on Your Headshot?
Your name MUST be on your printed headshot. You can either print with a white/black border and put your name at the bottom left or right corner, or you can choose to print full-bleed (edge to edge with no border) and get your name printed somewhere else on the page.
Technically it doesn't matter where your name is as long as it's easy to see and read. Casting directors don't care if your photo has a border or is printed full-bleed.
Some actors choose to be creative with the fonts they use for their prints. They'll create a branded look across their website, business cards, demo reel, and headshots by always using the same font. This can be helpful but is not required.
Should My Headshot be Matte or Glossy?
Actor headshots must be printed with a satin or semi-gloss finish (NOT matte).
Flat matte paper is too similar to regular computer paper and doesn't look professional enough, and glossy paper is considered too shiny for headshot prints. Casting directors don't like it because the reflections make it difficult to see your face easily.
If you're planning to pay to get your headshot printed, you can use a company like Print Headshots or Actor's Photo Lab, and they'll make sure to print your photo on the right paper.
If you're wanting to print them out on your own, be sure to use 8" X 10" semi-gloss paper, and print with a high-quality inkjet printer. The paper you use should ideally be at least 10 mil in thickness.
Do NOT print your resume directly on the back of your headshot because A) most photo paper is not designed to be printed on the reverse side and B) your resume will constantly be changing as you move forward in your acting career. If you print out a bunch of headshots with your current resume, you won't be able to keep updating it as you gain more experience.
Should Actor Headshots be in Color or Black & White?
Color headshots are a must these days – both the digital version AND the printed version.
- Casting directors want to know what you look like, and a black and white photo won't let them see your hair color, eye color, or skin tone.
- Agents and managers hate black and white headshots because they assume it means you're the type of actor who rarely updates your marketing materials, meaning they'll always have to struggle to find you work. Would they ever sign someone like that?
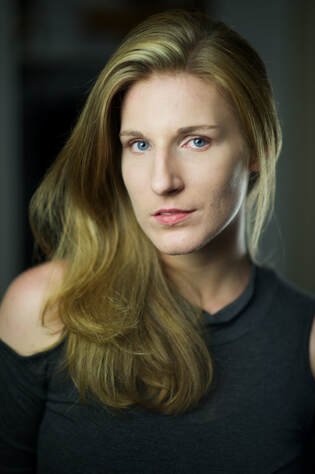
Should I Do a Vertical or Horizontal Headshot?
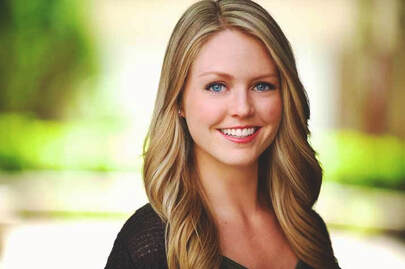
Either works, but vertical headshots tend to be more common and versatile.
Theater playbills typically use vertical headshots, as do most casting websites. In addition, some casting directors HATE horizontal headshots because they can't be easily flipped over to read the resume stapled to the back. They have to turn it after flipping (don't ask – we know it sounds crazy, but they're very busy people and having to flip and turn 1,000 headshots a day can get tedious).
Note: we usually post horizontal headshots on our website because they look better on webpages. Even so, we still recommend our clients take vertical headshots with us for the increased versatility. Learn more about our Actor Headshot work here.
|

|
3 Numbers All Actors Should Know
Knowing how to crop your headshots is important, but it's just one small part of growing your acting career.
If your goal is to act full-time, you should know these 3 numbers:
If your numbers aren't there yet, that's OK! It's certainly not easy to audition and book that much.
But those are actual, real numbers from busy, working actors who didn't just get lucky.
Those busy, working actors started at the beginning – for them, the biggest question swirling in their minds at the time was:
How do I get taken seriously by casting directors when I don't have good credits or footage? And how do I get credits/footage without being taken seriously by casting directors?
It's the classic actor's catch 22.
When we're struggling to get our careers off the ground, our minds can slip into "desperation mode" and start looking for quick-fix solutions. We'll ask ourselves questions like:
But questions like those mean you're focused on Tactics, instead of Strategy.
Think about it this way: Would you bake a cake by randomly sliding a pile of flour, eggs, and chocolate into the oven? Of course not! How you combine the ingredients, the temperature you cook it at, and for how long are all just as important.
Similarly, the long-term, well thought-out strategy you follow as you grow your acting career matters. A LOT.
That's why "strategic thinking" is one of the greatest gifts you can give yourself as an actor.
So today I'd like to give you a gift: 3 tools specifically designed to help you start thinking and operating strategically.
These tools have helped over 14,000 actors so far, many of whom have gone on to:
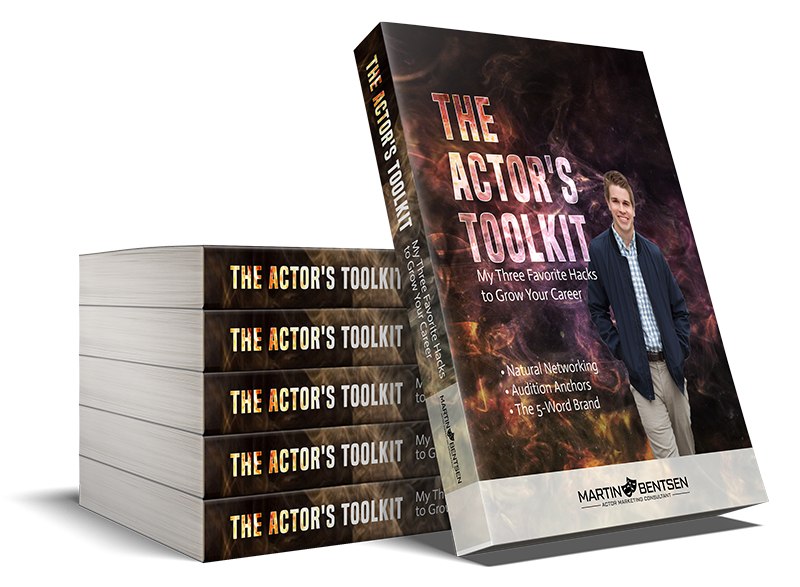
My free Actor's Toolkit will help you BLAST through the actor's catch 22 so you start getting WAY more auditions and bookings every month:
If your goal is to act full-time, you should know these 3 numbers:
- 40-60 Submissions – This is how often full-time, working actors submit themselves (whether they have an agent or not) each month.
- 10-20 Auditions – This is how many times full-time working actors audition (or at least record and submit self-tapes) each month.
- 3-5 Bookings – This is how often full-time working actors book real, paid acting jobs each and every month.
If your numbers aren't there yet, that's OK! It's certainly not easy to audition and book that much.
But those are actual, real numbers from busy, working actors who didn't just get lucky.
Those busy, working actors started at the beginning – for them, the biggest question swirling in their minds at the time was:
How do I get taken seriously by casting directors when I don't have good credits or footage? And how do I get credits/footage without being taken seriously by casting directors?
It's the classic actor's catch 22.
When we're struggling to get our careers off the ground, our minds can slip into "desperation mode" and start looking for quick-fix solutions. We'll ask ourselves questions like:
- "Should I take another acting class?"
- "Do I need better headshots or should I pay to shoot a reel?"
- "What's the fastest way to get an agent?"
But questions like those mean you're focused on Tactics, instead of Strategy.
Think about it this way: Would you bake a cake by randomly sliding a pile of flour, eggs, and chocolate into the oven? Of course not! How you combine the ingredients, the temperature you cook it at, and for how long are all just as important.
Similarly, the long-term, well thought-out strategy you follow as you grow your acting career matters. A LOT.
That's why "strategic thinking" is one of the greatest gifts you can give yourself as an actor.
So today I'd like to give you a gift: 3 tools specifically designed to help you start thinking and operating strategically.
These tools have helped over 14,000 actors so far, many of whom have gone on to:
- Book Broadway roles
- Land network television and Netflix shows
- Sign with agents and managers
- And much more – faster than you'd expect (you can see some success stories here).
My free Actor's Toolkit will help you BLAST through the actor's catch 22 so you start getting WAY more auditions and bookings every month:
|
The Actor's Toolkit:
|
|

|
Martin Bentsen (author of this guide) is an actor marketing coach who uses strategic thinking to help actors book more work. He’s helped over 14,000 actors with their careers and actor headshots since 2009 and his photography studio City Headshots is ranked #1 on Yelp. He’s spoken at NYU, The New England Theater Conference, The Actor’s Green Room, and other venues. Want to book more acting work by thinking strategically? Start with his free Actor’s Toolkit to create new opportunities right away, or visit his website at www.martinbentsen.com. |
You've reached the end of the actor section! Skip ahead to Part 3: General Advice.
Part 2: Business Headshots
Unlike actor headshots, business headshots do not need to be 8" X 10" and they technically have no specifications.
They can be shot in any format, and the format is usually dictated by wherever you plan to use them. For instance, if you're shooting for LinkedIn or other social profiles like Facebook, Twitter, or Instagram, your shot will be formatted as a circle (meaning it would technically be cropped as a square).
If you're you're trying to figure out your headshot size for a website, remember that the specs can vary greatly, from horizontal to vertical, 8" x 10", 5" x 7", 4" x 6", or almost any other format you can think of!
For this reason, most headshot photographers will shoot business portraits further out, planning for you to crop in on them afterwards. We'll now discuss exactly how to do that.
Cropping for Business Headshots
Because most photographers take business headshots further out, they might look silly if you don't crop them.
In this section, we'll go over some tips on how to crop headshots so your image doesn't cut you off at a weird place.
In this section, we'll go over some tips on how to crop headshots so your image doesn't cut you off at a weird place.
Tip 1: Your head should be in the upper third of the image.
Whenever you crop a photo, it can be helpful to imagine a grid, sectioned into thirds. You should aim to align your eyes with upper-third line of the grid when cropping tight, and if you're cropping wider, be sure that your head is positioned within the top third of the image.
This is called cropping using the Rule of Thirds and will ensure you use proper framing rules.
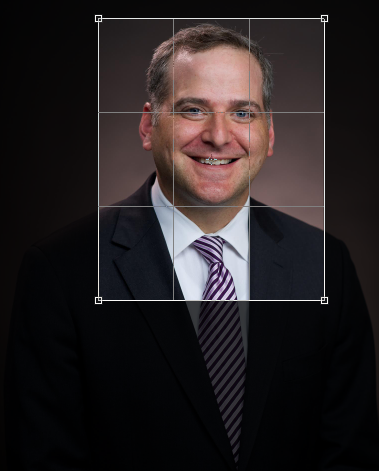
Tip 2: Make sure your face is centered (left/right).
For actors, we typically shoot them slightly off-center on purpose, but when it comes to professional photos for LinkedIn, it's generally not a good idea to have an off-center photo because it can make people think you made a mistake.
Tip 3: Don't crop too wide or too close.
With actors, we love cropping off the tip of the hair, but for business shots, you should keep the top of your hair in the frame. Just like being centered, cropping off the top of your hair could look like a mistake to people who don't know your intent, and you don't want people thinking you're the type of person who makes mistakes, right?
The best place to crop is usually right above the chest. In a male headshot for example, you should crop right above where the tie meets the jacket.

This is a wider crop, but might be too far out for LinkedIn.
|

Don't crop much closer than this.
|
Tip 4: Your face should be the focus.
You don't want too much space above your head, or too much of your shoulders compared to your face. Your face should take up about 1/3 of the photo. Your body should take up another third, and the backdrop should take up the final third.
Headshot File Size and Dimensions for Different Platforms
Depending on where you're going to use your headshots, you'll need to have them formatted a certain way. Below are the most common formats for headshot dimensions online, plus maximum file size:
- LinkedIn: 400 x 400 pixels minimum recommended, 8MB max file size.
- Facebook: 170 x 170 pixels minimum recommended, 1.75GB max file size.
- Instagram: 240 x 240 pixels minimum recommended, 30MB max file size.
- Twitter: 400 x 400 pixels minimum recommended, 2MB max file size.
- Medical Residency (ERAS): 375 x 525 pixels (exactly), 100KB max file size.
- Gmail: 180 x 180 pixels minimum recommended, 5MB max file size.
- US Passports: 2" x 2" printed hard-copy, 72 dpi minimum resolution.
Part 3: General Advice
In this final section, we'll show you how to crop your image using your computer (or online software).
We'll also go over some ways to use your new headshots, some of which might surprise you!
We'll also go over some ways to use your new headshots, some of which might surprise you!
How to crop? What programs to use?
If you are on a Mac, the standard photo viewing and editing application is called “Preview"
Here's a great video showing you how to crop with Preview.
If you are on Windows, the standard photo application is “Paint”
Here's a great video showing you how to crop with Paint.
You can also try out this website: Image Resize
Just follow the instructions on that site to crop without either of the aforementioned programs.
- Open your image in "Preview" and ensure your selection tool is set to “rectangular selection.”
- When you scroll your cursor over the image you should see a cross.
- Then click and drag your cursor across the image to select the portion you would like to crop (the dimensions of your crop should be displayed at the bottom right corner).
- With your crop selected, you can use the “Tools” dropdown menu at the top of your screen to select “crop,” or use the shortcut “command+K.”
Here's a great video showing you how to crop with Preview.
If you are on Windows, the standard photo application is “Paint”
- Open your image, then under the home tab in the “Image” group, you will see the option to “Select” and the option to “Crop.” Select the section of the image you would like to keep then choose the “Crop” option.
- Voila, your image has been cropped! Be sure to select “Save As…” when you save the image to create a new file so as not to overwrite the original file–you may need to use a different crop in the future!
Here's a great video showing you how to crop with Paint.
You can also try out this website: Image Resize
Just follow the instructions on that site to crop without either of the aforementioned programs.

Where to Use My New Headshots?
There are tons of ways you can effectively use your new headshots. Here are just a few:
- LinkedIn – This one should go without saying, but no LinkedIn profile is complete without a professional headshot. LinkedIn allows you to find jobs and network with different people in your industry. Actors can use it too!
- Casting Websites – If you're an actor, almost everything these days is done online. You should upload your headshots (and reel, for that matter) to any casting websites you use, such as Backstage, Actor's Access, Model Mayhem, and more. Be certain your headshot complies to the specifications and crop it properly so it looks good as a thumbnail-sized image.
- Website or Blog – These days, almost everyone has a blog or some sort of online presence. If you have a blog or website, you should upload your new headshot to the "About" page next to your bio. If don't yet have a website or blog, you should consider building one! There are many free website design programs out there that are simple to use.
- Other Marketing Materials – If you're planning on doing any speeches or presentations in the future, be sure to keep your headshot in an easy-to-access folder so you can send it to graphic designers who need it at a moment's notice for promotional pieces. It's also important that you download and save your headshot to your own computer in case your photographer ever deletes your link.
- Email Profile Image – Be sure to update the profile image in your phone's contact list and your email systems, such as Gmail or any other communication software you use. Remember, your image shows up to everyone each time you send a message, so you should be sure the image showing is the one you want.
- Facebook and Other Social Profiles – Many people are concerned about uploading a professional headshot to their social media pages because they don't want to seem "full of themselves." Well don't worry – you won't look like that! Using your new headshot on your favorite social media profile will not only help in your professionalism, but it will also help your friends because they will say to themselves, "Well, if he/she is willing to upload a headshot here, I will too." And then everyone can have a great headshot on their social profiles!
- Business Cards – Having your headshot on your business card makes it easy for people to remember who you are later on. It means your card is less likely to be thrown out, as it will give those meeting you a visual reference if they ever forget who you are in the future.
- Online Dating – It's much more common than you think to get online dating photos taken professionally. We work with people at least a few times a month who need better photos for their dating sites. In most cases, it's best to use half-body or full-body shots, but for your small profile image, a headshot can work great, especially if it was shot outdoors.
Enjoyed this article?
Book more work by thinking "Outside the Industry."
Knowing how to crop and use your headshots properly is just one part of growing your acting career.
As someone who has worked with people in thousands of industries (through my headshot business), I've been able to take growth strategies that work for businesses and apply them directly to actors – to help them grow their careers faster than most would think possible (examples: one of my clients landed his first-ever Broadway role in just 4 weeks of working with me, and a brand-new actress signed with a high-level agent in just six weeks of working with me).
I'd like to invite you to my free insider newsletter where I share my best material, including:
- How to network easily and authentically with casting directors – even if you hate self-promotion.
- How to find your Type and Brand in just 18 minutes (it doesn't require awkwardly asking lots of random people for feedback)
- How to find a hardworking and reliable agent – even if you don't have a strong resume or reel
- And much more...
Download my free Actor's Toolkit to get started and you'll hear from me a few times a week with unique "outside the industry" strategies. I promise they'll help you build a career you're truly proud of.

|
Martin Bentsen (author of this guide) is an actor marketing coach who uses “outside the industry” thinking to help actors book more work. He’s helped over 6,000 actors with their careers and actor headshots since 2009 and his photography studio City Headshots is ranked #1 on Yelp. He’s spoken at NYU, The New England Theater Conference, The Actor’s Green Room, and other venues. Want to book more acting work by thinking different? Start with his free Actor’s Toolkit to create new opportunities right away, or visit his website at www.martinbentsen.com. |
Further Reading:
If you enjoyed this article (Headshot Size & Dimensions: How to Crop), you might be interested in some of these:
0 Comments
Your comment will be posted after it is approved.